Red Velvet Hot Cocoa

Red Velvet Hot Cocoa

Appliances Reviewed is reader-supported. When you buy through links on our site, we may earn an affiliate commission.
As an Amazon Associate I earn from qualifying purchases.

“a sweet gift for your tongue that can warm your heart”

Red Velvet Hot Cocoa

If you love a red velvet cake, you’re going to absolutely adore this sweet hot cocoa variation that’s very easy to prepare. If you have a sweet tooth, then this might be the perfect treat for whenever those sugar cravings kick in.

Let’s face it – we don’t always have one to three hours to make that delicious, creamy chocolate cake we saw on the cooking channel. I mean, it’s an amazing dessert idea for special occasions and when you’re expecting guests, but what’s a better alternative when it’s just you and you don’t have much time? I’ll tell you – red velvet hot cocoa!

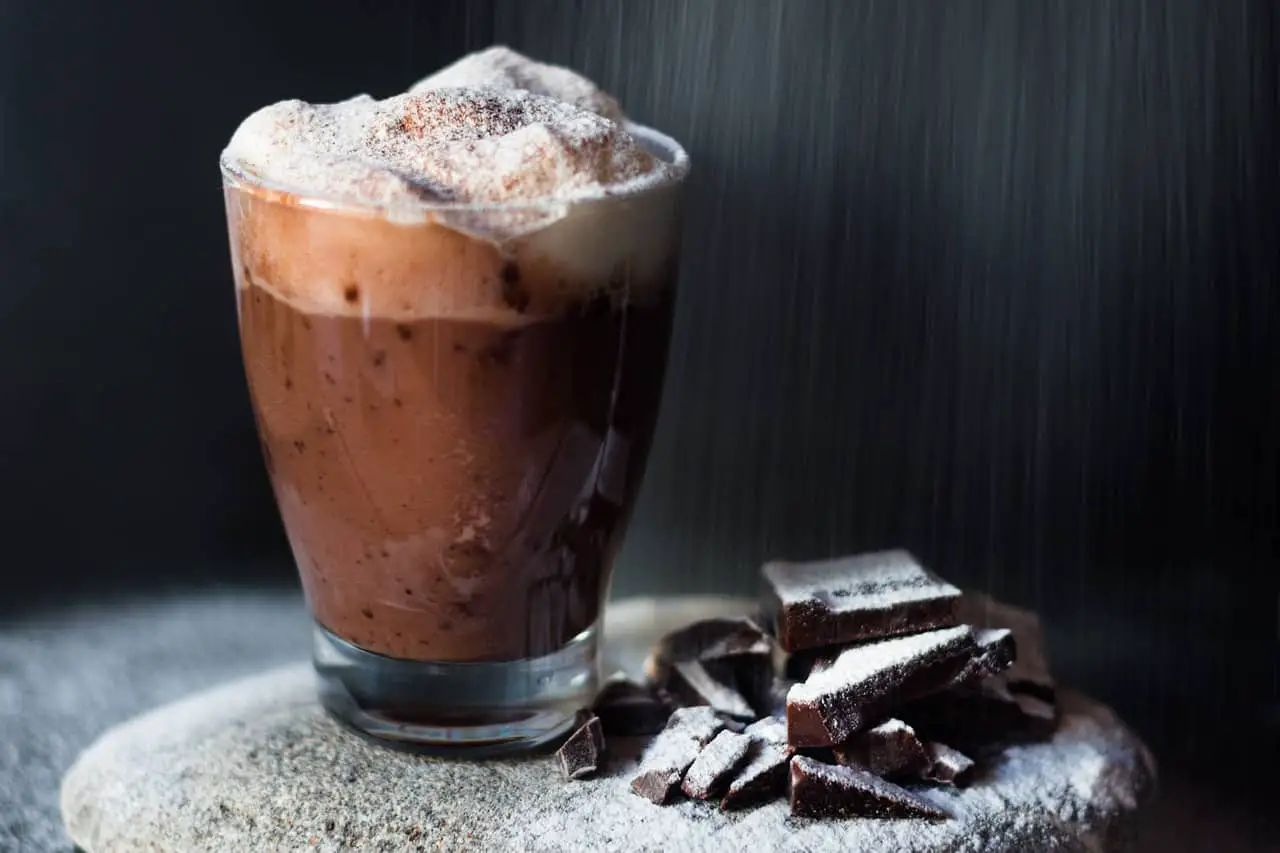
I’m actually doing this little mug filled with pure happiness a little bit of an injustice, as it’s more than a cake alternative and it deserves to have a special spot in the dessert menu. It’s that good! You’re looking at a very dense, creamy drink with chocolate flavor and a hint of caramel, due to the maple syrup. Prepare yourself for the familiar mouthwatering taste of chocolate, yet with an untypical and uniquely delicious twist. The distinctive red color makes the whole experience even more special.

So, without further ado, let’s get our hands chocolaty! You won’t need more than 15 minutes in total, as the preparation time is no more than 5 minutes, and the whole cooking time no more than 10 minutes. The recipe below is for a single serving, but feel free to double or triple the ingredients for whenever you want to share a cup of hot cocoa with your friends and family.

Everything you’ll need to make this recipe, aside from the ingredients, is one big saucepan, one metal bowl (if you have a double boiler that’s even better), a hand mixer (or another alternative), and your favorite mug. Sounds pretty simple, right?

The first thing you need to do is boil water over high temperature on the stove. Once the water starts boiling, turn the heat on medium, and place a metal bowl on top. Keep in mind, the bottom of the metal bowl shouldn’t touch the water in the saucepan.

Next, crush the dark chocolate into small pieces and place them in the metal bowl. The smaller the pieces of chocolate are, the faster they’ll melt, but other than that it really doesn’t matter how you crush the chocolate. When you see that the chocolate is melting, start stirring and make sure there are no lumps.

While the chocolate melts start pouring the milk very slowly. Stir at all times. This is going to help you feel the consistency and stop before you make it too watery, especially if you like your cocoa more creamy. Usually, a glass of milk (250ml) is just enough for a cup of cocoa, but you might like it better with slightly less or more milk. It really depends on your personal preferences, so don’t be afraid to change the amount a little if you feel it’s right.

When the milk blends completely with the melted chocolate, add the maple syrup and the red food coloring. Continue to stir until the color is well-mixed. This usually takes a minute or two.

Turn the stove off, transfer the cocoa into a mug, and leave it aside while you make the white cream. You can always have your red velvet hot cocoa without anything, but I believe some whipped cream on top would really set it apart.

Mix together the cream, sugar, and almond extract in a big bowl. You can use a mixer, a whisk, or simply a spoon, as it’s not much and you’ll probably have even more control whipping it by hand. Once you have a stable cream, shape it over the mug of hot cocoa.

Finally, sprinkle with anything you can find at home, like chocolate chips, coconut flakes, biscuits, cherry, or anything else that sounds delicious.


Prep Cooking time Total Servings
5 mins 10 mins 15 mins 1

Ingredients

For The Hot Cocoa:

  • 1 glass (250ml) milk (optional: plant-based)
  • 60-70g dark chocolate
  • 1 tsp maple syrup
  • 1 ½ tsp red food coloring

For the white cream on top:

  • 4 tbsp whipped cream
  • 1 tbsp powdered sugar
  • ½ tsp almond extract

Instructions

  • In a saucepan boil water over high heat. Turn to medium and place a metal bowl on top of it.
  • Crush the chocolate into small pieces and add them to the metal bowl. Stir while they melt.
  • Slowly pour the milk into the melted chocolate. Stir well.
  • Mix in the red food coloring and maple syrup. Stir for one-two more minutes, then remove from heat. Transfer the hot cocoa to a mug.
  • Whip the cream together with the powdered sugar. Add the almond extract while whipping.
  • Add and shape the whipped cream over the hot chocolate.

Enjoy your delicious treat!

Pumpkin Apple Cider Doughnuts

Appliances Reviewed is reader-supported. When you buy through links on our site, we may earn an affiliate commission.
As an Amazon Associate I earn from qualifying purchases.

“the perfect sweet and sour delight”


Nothing satisfies a sugar craving like a moist doughnut! However, considering the amount of saturated fat they have, you need to ask yourself, are they really worth it? You’ll probably say yes because knowing all this I still wasn’t ready to give up on donuts. However, I began searching for a way to make them a little bit healthier and that brought me to this pumpkin apple cider doughnuts recipe. This way, I can still afford to eat donuts guilt-free!

The first major thing I changed was the cooking method. Traditionally, donuts are deep-fried in oil, while my pumpkin apple cider doughnuts are baked. The taste might change slightly since fried doughnuts are moister and oilier, but the glaze completely compensates for that!

On top of that, the pumpkin puree adds a squashy quality that makes the doughnuts softer and more sugary. The cider adds an intense, apple aroma, creating the perfect balance between sweet and sour.

To make this recipe, you’ll need a donut pan, but a simple baking sheet and a ziplock bag can also be used as an alternative. Also, you’ll need a large mixing bowl and the ingredients listed below. Best of all, you’ll need only half an hour for the whole recipe.

Let’s make some delicious donuts!

First things first, preheat the oven to (180°C) 350°F.

After this, start by mixing all of the dry ingredients in a large mixing bowl. Combine the flour, baking powder, brown sugar, pumpkin pie spice, and salt. When the ingredients are well combined, start stirring in the pumpkin puree, egg, milk, melted butter, and apple cider one by one. Beat the blend for about 5 minutes. The final result should be a smooth dough that’s not too sticky. If it sticks too much, use more flour. Leave the batter aside.

If you have a donut pan, then the only thing you need to do is grease it with cooking oil or melted butter. However, if you don’t have a special donut pan, that’s okay, because you can also make incredibly delicious doughnuts with a simple baking sheet. To do this, place a piece of parchment paper over the baking sheet, then grease it with cooking oil or melted butter. After this, transfer the batter into a ziplock bag and make a small hole in one corner. Use the bag to make doughnut-shaped circles on the baking sheet. Make sure there’s enough distance between them so they don’t merge while baking. If the batter is solid and dense, you won’t have that problem.

When you’re done, place the baking sheet or the donut pan into the oven and bake for 15 minutes, considering the oven is preheated. If you haven’t preheated the oven, then wait for it to heat before baking.

While the donuts are baking, you can prepare the glaze. It’s actually very, very simple, and you’ll only need to combine the vanilla extract, milk, powdered sugar, and cinnamon and whisk until you get a smooth cream. Of course, the glaze is completely optional, and if you prefer some other topping, or maybe filling, feel free to experiment and personalize the recipe to your taste.

When the doughnuts are done baking, let them rest at room temperature for 10 minutes. After, dip each donut halfway into the glaze from both sides. Place it on a serving plate and sprinkle with cinnamon. Enjoy!


Prep Cooking time Total Servings
20 minutes 15 minutes 35 minutes 18

Ingredients

For the donuts:

  • ½ cup of apple cider
  • 1 cup of pumpkin puree
  • 2 eggs
  • 3 cups of all-purpose flour
  • 3 ½  tsp baking powder
  • 1 cup of brown sugar
  • 1 tsp pumpkin pie spice
  • ½ tsp salt
  • ½ cup of milk
  • 3 tbsp butter (melted)

For the glaze:

  • 1 cup powdered sugar
  • 2 tbsp milk
  • ½ tsp vanilla extract
  • ¼ tsp ground cinnamon

Instructions


  • Preheat the oven to (180°C) 350°F.
  • Take a large mixing bowl and combine the flour, baking powder, brown sugar, pumpkin pie spice, and salt.
  • Stir in the eggs, pumpkin puree, milk, melted butter, and apple cider. Beat the mixture until you get a smooth dough. If it’s too sticky, add more flour.
  • Prepare a non-stick donut pan by greasing it with cooking oil – OR…
  • If you don’t have a donut pan, prepare a non-stick baking sheet by greasing it with cooking oil. To make a donut shape, pour the batter into a large ziplock bag and make a small opening in one corner. Use the bag to make donut shaped circles on the baking sheet. Leave enough distance between each donut.
  • Place the donut pan or baking sheet into the preheated oven and bake for 15 minutes.
  • In the meantime, prepare the glaze by whisking together the powdered sugar, vanilla extract, milk, and cinnamon in a small bowl. Stir until the ingredients are well combined
  • When they’re baked, let the donuts cool at room temperature for 5-10 minutes.
  • Dip each donut halfway into the glaze, both sides, and place it on a serving plate.
  • Sprinkle with cinnamon and serve.

Chocolate Red Wine Loaf Cake

Appliances Reviewed is reader-supported. When you buy through links on our site, we may earn an affiliate commission.
As an Amazon Associate I earn from qualifying purchases.

“every bite feels like a warm embrace with exquisite taste”


There’s a saying that goes “You can’t live by wine alone, add some chocolate!” and this recipe does that so beautifully that you are really going to wish you could eat it every day for the rest of your life! At least, that is my biggest wish, as chocolate loaf recipes are my ultimate favorite food, or to put it better, my greatest weakness. Now, I know we can’t eat chocolate red wine loaf every day, and I’m not saying you should, but you should definitely make this recipe for a special occasion, when you want to impress some guests, or when life gets a little hard and you feel like you deserve something exquisite.

Because of the chocolate, the loaf is very soft and sweet with a velvet texture. The wine gives it a little bit of a bitter scent, while the whole cake has light vanilla notes with nutty flavor, due to the hazelnuts. Couple this with the natural sweetness of the chocolate and you get a heavenly pairing.

I haven’t specified in the ingredients list, but if you want to take the recipe one step further you can find the optimal wine-chocolate combination. For example, if you’re using dark chocolate you should use a wine like PX Sherry, Barolo Chinato, Banyuls, Dolcetto, while for milk chocolate is better to use Alsace Pinot Gris, Tawny Port, or other. The delicious relationship between red wine and chocolate is well documented, so you can spend some time finding a combination that fits your preference.

Without further ado, let’s make this perfect treat!

To make this recipe you’ll need a loaf pan, saucepan, parchment paper, a hand mixer (see my top picks here), two large mixing bowls, and one heatproof bowl, aside from the ingredients listed below. You’ll need to spend around 40 minutes in the kitchen and wait for an hour while the cake is being cooked, but trust me, it’s more than worth it.

The first thing you want to do is to preheat the oven to 175°C (350°F). Don’t forget this step, as it will save you a lot of time later.

After this, take a large mixing bowl and combine together the flour, baking powder, cocoa powder, ground hazelnuts, cinnamon, and a pinch of salt. Mix until all the ingredients are fused, then set it aside.

Take another mixing bowl and whisk in the sugar and butter. When the mixture becomes soft and light, stir in the eggs, vanilla extract, and a little bit of wine. Mix for a minute or two, then take the first bowl and start to slowly add the dry ingredients’ blend into the batter. To make sure it’s easy to mix and you have a good consistency, add the wine a little bit at a time, alternating between wine and the dry ingredients. Mix for another minute or two until everything is well combined, then chop half of the chocolate and throw the chocolate pieces into the batter. Mix again.

The next step is to line the loaf pan with parchment paper and grease it with butter or oil. Transfer the batter into the loaf pan and spread it evenly. Place the loaf pan into the preheated oven and let it cook for an hour.

To make sure I’m using my time optimally, what I like to do is make the chocolate glaze around 15 minutes before cooking is complete. This way, I can immediately pour the glaze over and serve it once cooled. However, you can also make the glaze after the cake is baked.

Boil water over high heat in a small saucepan and once the water starts bubbling, lower the heat to medium and cover it with a heatproof bowl. Combine the remaining pieces of chocolate, coconut oil, and mil into the bowl. Stir until the chocolate melts completely then aside. The chocolate glaze will thicken as it cools.

When cooking is complete, take the loaf out of the oven and immediately cover it with the chocolate glaze. Let it cool at room temperature for around 15 minutes then serve. I like to eat it with a glass of red wine and fresh strawberries or raspberries, but it’s totally up to your preference and taste! Enjoy!


Prep Cooking time Total Servings
30 minutes 1 hour 1 hr 30 mins 8

Ingredients

  • ½ cup red wine
  • 8 tbsp butter
  • ¾ cup of brown sugar
  • 3 eggs
  • 2 cups flour
  • 2 tsp baking powder
  • 1 tsp vanilla extract
  • 18 tbsp chocolate (your preferred type)
  • 2 tbsp cocoa powder
  • 6 tbsp ground hazelnuts
  • ½ tsp cinnamon
  • 1 tbsp coconut oil
  • 2 tbsp milk
  • A pinch of salt

Instructions

  • Preheat the oven to 175°C (350°F).
  • Take a large mixing bowl and combine together the flour, baking powder, cocoa powder, ground hazelnuts, cinnamon, and a pinch of salt. Mix well and set aside.
  • Take another mixing bowl and whisk the butter and sugar, until the ingredients are well combined. Stir in the eggs, vanilla extract and continue to beat the mixture. After this, add a little bit of wine and continue to mix.
  • Slowly add the mixture of dry ingredients from the first bowl into the batter. Gradually pour in the wine as well. Mix for another minute or two, then stir in half of the chocolate (cut into tiny pieces). Mix again.
  • Take the loaf pan and line it with parchment paper. Grease the parchment paper with a little bit of cooking oil or butter, and transfer the batter into the loaf. Spread it evenly.
  • Place it in the preheated oven and cook for one hour.
  • Ten to fifteen minutes before cooking is complete boil water in a small saucepan and cover with the heatproof bowl. Add the remaining chocolate pieces into the bowl together with the milk and coconut oil. Stir until the chocolate melts. Set the glaze aside to cool and thicken.
  • When cooking is complete take the loaf out of the oven. Pour the chocolate glaze over and leave it at room temperature to cool for around 15 minutes.
  • Serve with a glass of red wine and/or fresh fruit. Enjoy!

Quinoa Pudding With Maple And Cinnamon

Appliances Reviewed is reader-supported. When you buy through links on our site, we may earn an affiliate commission.
As an Amazon Associate I earn from qualifying purchases.

“a delicious bowl of health and energy”

We’ve already talked about chia seed puddings and how delicious they can be – an abundance of flavors that can suit every taste. However, there’s another nutrient-dense superfood that can make some yummy, yet incredibly healthy pudding. Let me introduce you to quinoa – the superfood that goes so well with caramelized apple slices, maple syrup, and cinnamon.

Did you know that quinoa is gluten-free? Yep, which means you can easily satisfy your sweet cravings even if you’re on a gluten-free diet. Plus, quinoa is considered a superfood because it’s an amazing source of antioxidants and minerals – even more than grains – but they’re packed in significantly fewer calories. A sweet maple syrup cinnamon breakfast pudding that aids weight-loss? – Sign me up!

Best of all, quinoa actually tastes good. If I had to describe the taste, I would say that quinoa is somewhere between brown rice and oatmeal. Its texture is airy and, fluffy, with just a hint of crunch. Combined with maple syrup and cinnamon, the pudding tastes sweet, with a delicate fruity hazelnut flavor.

This quinoa pudding is a great breakfast meal since it will take you less than 30 minutes to make. Plus, you’ll have four servings, meaning the whole family can eat! Isn’t that wonderful? A healthy, quick, and easy-to-follow recipe that will help you start your day with a lot of energy!

To make this recipe, aside from the ingredients listed below, you’ll need two saucepans and four serving bowls.

Start by placing a saucepan over medium heat. After a minute or two, add the milk, brown sugar, vanilla extract, maple syrup, and cinnamon and stir well. Let the mixture boil and once it starts bubbling fold in the quinoa. Stir for a minute or two, then lower the heat and let the quinoa simmer. Stir every five minutes.

In the meantime, peel the apple and cut it into eight slices. The easiest way to do this is to cut the apple into quarters, then cut each quarter into two equal slices. The goal is to have eight apple slices because we want to have two slices of apple for each serving bowl.

Take another saucepan and place it over medium to high heat. Once it’s heated, add the butter and let it melt. After this, add the brown sugar, cinnamon, and apple slices. Continue to turn the apple slices in the saucepan until they’re fully covered with the caramel mixture from both sides.

After 10 minutes, remove the apples from the stove, and let them cool at room temperature.

Check the quinoa. As it cooks, the quinoa will thicken and it will absorb the liquid, becoming soft and fluffy. Usually, it takes around 20 to 30 minutes until its fully cooked, but observe it and remove it from heat once you notice that it has absorbed most, but not all, of the liquid in the saucepan. This is because once we let it chill at room temperature, the quinoa will continue to thicken and absorb liquid – we don’t want it completely dry!

Once you remove the quinoa from the stove, divide it into four serving bowls and let it cool for five to ten minutes. After this, place two slices of caramelized apples over each serving bowl and pour a little bit of maple syrup.

And that’s it – you can gather the whole family for a delicious and nutritious breakfast! Don’t worry if you have picky eaters, this recipe is not something they’ll complain about!


Prep Cook time Total Servings
5 minutes 30 minutes 35 minutes 4

Ingredients

  • 1 cup of quinoa
  • 4 cups of milk
  • ¼ cup of brown sugar
  • 1 tsp vanilla extract
  • 1 tsp cinnamon
  • 1 tbsp of maple syrup (plus for topping)

For the caramelized apples:

  • 1 sliced apple (granny smith)
  • 1 tbsp butter
  • 1 ½ tbsp brown sugar
  • 1 tsp cinnamon

Instructions

  • Take a saucepan and place it over medium heat. Add the milk, brown sugar, vanilla extract, maple syrup, and cinnamon. Stir well. Once the mixture starts bubbling, fold in the quinoa. Reduce the heat then let it simmer while you stir occasionally.
  • Peel the apple and slice it into quarters, then each quarter into two equal slices. You’ll have eight slices.
  • Take another saucepan and place it over medium to high heat. Melt the butter, then add the brown sugar, cinnamon, and apple slices. Toss and turn the apples for around 10 minutes until they’re well covered with the mixture on both sides, then remove from heat.
  • Once the quinoa has absorbed most, but not all, of the liquid (it’ll take around 20-30 minutes) and has thickened, remove from the stove.
  • Divide the quinoa into four serving bowls and let it cool at room temperature for 5 minutes.
  • Place two caramelized apple slices on each bowl and pour maple syrup over them.
  • Serve and enjoy!

Raspberry Swirl Buttermilk Pancakes

Appliances Reviewed is reader-supported. When you buy through links on our site, we may earn an affiliate commission.
As an Amazon Associate I earn from qualifying purchases.

“seriously yummy, fluffy, and fruity breakfast pancakes”


How do you imagine your perfect breakfast? Mine is shaped like a big tower of delicious cocoa-flavored pancakes, filled with chocolate cream and some fresh fruit. Tell me you aren’t already feeling the sweetness in your mouth? Couple that with a freshly squeezed orange juice with an intense acidic flavor that tickles your tongue and feels amazingly refreshing.

I’m telling you – it’s a match made in heaven.

Seeing that I mastered the art of making pancakes for breakfast, today I’m sharing with you this incredibly tasty raspberry swirl buttermilk pancake recipe.

The vibrant flavor of the raspberries is totally going to you charm you, especially in the form of raspberry coulis. The sweet touches of the nutmeg and vanilla extract feel like a warm embrace that accent the flavor of the cocoa. I’ve also made pancakes with a rum aroma, so if rum is a flavor you like, just trust me that you’ll absolutely adore it in the pancakes.

Finally, no pancake is ever complete without a sweet and creamy topping, so the raspberry coulis combined with chocolate chips and white chocolate curls is everything you’ll ever need.

Pancakes are great for breakfast not only because they taste so yummy, but because they’re really easy to make. For example, this whole recipe won’t take more than 30 minutes to make. All you need is the ingredients listed below, a small saucepan, a pancake pan, and two mixing bowls – it’s that simple.

The first step is to make the raspberry coulis, and to do this, all you need to do is mix together the raspberries with the powdered sugar in a small saucepan. Place the saucepan over high heat and constantly stir until you see the raspberries lose their shape and let go of their juices. After this happens, continue to stir for a minute or two until you see that the coulis start to thicken. Remove the pan from heat and set it aside. Don’t worry if the consistency is a little more watery – the coulis will thicken as it cools.

Now that you got that out of the way, it’s time to make the pancake batter. Start by mixing all of the dry ingredients in a large mixing bowl. Combine the flour, brown sugar, baking powder, cocoa powder, and nutmeg. Take another mixing bowl and combine all of the wet ingredients – the eggs, buttermilk, vanilla extract, and butter. Stir well, then pour the wet ingredients into the bowl with the dry. Beat for a minute or two with a hand mixer.

After this, grease a pancake pan with melted butter over medium to high heat. You can also use a griddle, a specially shaped pancake pan, or a simple non-stick frying pan – everything is okay.

Ladle a little bit of the pancake mixture into the pancake pan and pour the raspberry coulis in a swirl pattern into the batter as it cooks. Let it cook for a few minutes, then flip it and cook for another minute or two. You’ll know that it’s time to flip the pancake once the edges get dry and the batter starts bubbling. You can pour raspberry coulis in a swirl pattern from the other side too, or you can apply it to only one side – it’s up to you and to how intense you want the raspberry flavor to be.

Finally, after you make all the pancakes, place them in a serving plate, and pour some of the raspberry coulis over them. I like to sprinkle chocolate chips, white chocolate curls, and two or three fresh raspberries. This way, not only do they taste like the perfect breakfast, but they look perfect too. Enjoy!


Prep Cooking time Total Servings
5 minutes 30 minutes 35 minutes 6

Ingredients

For The Pancakes: 

  • 1 cup all-purpose flour
  • 1 cup of buttermilk
  • 1 egg
  • 2 tbsp melted butter
  • 2 tbsp brown sugar
  • 2 tsp baking powder
  • 2 tbsp cocoa powder
  • 1 tsp vanilla extract
  • 1 tsp ground nutmeg

For The Raspberry Coulis: 

  • 1 ⅔ cups of raspberries
  • 1 tbsp of powdered sugar

As Topping:

  • semisweet chocolate chips
  • fresh raspberries
  • white chocolate curls
  • raspberry coulis or maple syrup

Instructions

  • To make the raspberry coulis, mix together the powdered sugar and raspberries in a small saucepan. Place the saucepan on the stove over high heat. Once it starts to boil, reduce the heat and stir constantly until it thickens. Remove from heat and set aside.
  • Take a large mixing bowl and whisk together the flour, sugar, baking powder, cocoa powder, and nutmeg.
  • Take another mixing bowl and whisk together the eggs, buttermilk, butter, and vanilla extract. Stir until everything is well-combined, then pour the mixture into the bowl with the dry ingredients.
  • Stir once again.
  • Place your pancake pan over medium to high heat and grease it with butter.
  • Ladle the pancake mixture into the pancake pan and swirl a pattern into the batter from the raspberry coulis as the pancake cooks.
  • Once the edges begin to dry out and get darker in color, and the batter starts bubbling, flip the pancake over, and cook for another minute or two.
  • Once you’re done with cooking, place the pancakes on a serving plate and pour some raspberry coulis over them. Sprinkle chocolate chips, white chocolate curls, and 2-3 fresh raspberries. Enjoy!

Apple And Cinnamon Fruit Leather

Appliances Reviewed is reader-supported. When you buy through links on our site, we may earn an affiliate commission.
As an Amazon Associate I earn from qualifying purchases.

 “a delicious and easy-to-make version of your favorite childhood snack”

Do you remember eating fruit roll-ups as a child? I know I do! They were so delicious and sweet, with a very mild tarty flavor – simply a perfect snack! Now, of course, you can still buy fruit leather, but why spend money on something that’s made with additives, artificial sweeteners, and god knows what else when you can make fruit roll-ups at home almost effortlessly?

Best of all, you won’t feel guilty about letting your children enjoy this delicious snack because it’s actually healthy! This apple and cinnamon fruit leather recipe is one of my favorite flavors.

The only thing you’ll need to make this apple and cinnamon fruit leather is a blender, a saucepan, a baking sheet, and the ingredients listed below.

Your work in the kitchen is only 15 minutes, but the baking time takes around 3 hours. It’s important to bake the fruit leather on the lowest temperature your oven has, hence the long cooking time, but the tasty fruit roll-ups will make up for that!

The first step is to preheat the oven to 170°C (340°F). If your oven supports an even lower baking temperature – use that!

After this, wash the apples, peel them, and cut them into small pieces. I used Granny Smith apples since they have a very intense acidic taste, which I adore. However, feel free to use whatever apple brand you most prefer.

Next, take a saucepan and place it over medium to high heat. Pour the ½ cup of water and fold in the apples. Bring the mixture to a boil, then add the rest of the ingredients – the sugar, lemon juice, and cinnamon. If you like your roll-ups more tarty and acidic, use less sugar, or add more sugar to make them sweeter. Reduce the heat and cover the saucepan. Stir occasionally while the mixture simmers for around 7-8 minutes.

When you notice that the apples have become soft and start to break down, remove the saucepan from heat. Transfer the mixture into a blender and pulse until very smooth.

The next step is to prepare the baking sheet. Line it with parchment paper and lightly grease it with vegetable oil. Spread the mixture evenly on the baking sheet. Use a spatula to make sure the whole fruit leather is even throughout the baking sheet.

When that’s done, place the baking dish in the oven and bake for around two hours. Check the leather every 30 minutes. Once it has dried out and it’s not that sticky, you can remove the baking sheet from the oven and let it cool at room temperature for 5 to 10 minutes.

Cut the leather into horizontal strips with a knife. I made around 10 strips on one baking sheet.

Finally, roll the fruit leather and serve!


Prep Cooking time Total Servings
15 minutes 3 hours 3 hrs 15 minutes 10

Ingredients

  • 4 medium apples
  • ½ cup of water
  • 2 tbsp sugar
  • 1 tbsp lemon juice
  • 1 tsp cinnamon

Instructions

  • Preheat the oven to 170°C (340°F).
  • Peel and chop the apples into small pieces.
  • Take a saucepan and place it over medium to high heat. Add the apple pieces and ½ cup of water.
  • Add the sugar, lemon juice, and cinnamon. Stir well.
  • Bring to boil then reduce heat and simmer for 7-8 minutes (saucepan covered).
  • Continue to cook until the apples soften and start to break down.
  • Remove from heat, then transfer the mixture into a blender and pulse until smooth and creamy.
  • Take a baking sheet and line it with parchment paper. Grease it with cooking oil very lightly, then spread the apple-cinnamon mixture on the baking sheet.
  • Use a spatula to even out the mixture, making a thin layer all over the baking sheet.
  • Bake for 3 hours. Check every 30 minutes.
  • When the fruit leather is baked, take the baking sheet out of the oven and cut the leather into strips.
  • Roll the strips, serve, and enjoy!

Apple Pie Pull-Apart Bread

Appliances Reviewed is reader-supported. When you buy through links on our site, we may earn an affiliate commission.
As an Amazon Associate I earn from qualifying purchases.

“a rich bread dough that hides delicious treats between its slices”

Nothing goes better on a cold evening than an apple pie pull-apart bread. All the ingredients used for making the bread have this soft autumn vibe to them, which makes you appreciate this sweet treat even more. I’m feeling mellow just thinking of the last time I tasted it, so trust me when I say, the effort is worth it! Of course, you can cut the cooking time significantly by simply buying bread biscuits, but I found that sweet homemade bread dough is so much more delicious and takes this favorite to a whole other level! I’m saying this because I was using biscuits too until I found a recipe on Just A Little Bit Of Bacon, which is where I got the inspiration for my version of the apple pie pull-apart bread!

I used bourbon-soaked cherries and boiled apple slices as the main flavors for the amazing filling that will make this bread incredibly moist. Plus, if you’re a fan of the sweet but potent fragrance of vanilla and nutmeg, you’ll especially enjoy the glaze.

So, without further ado, let’s get cooking!

First, things first, you’ll need three or four mixing bowls, mixer, loaf pan, saucepan, microwave-safe bowl, and around an hour to spare to make this tasty bread, with a total cooking time of two hours. It’s worth mentioning that instead of instant yeast, I used sodium bicarbonate (baking soda) and lemon juice, so I didn’t have to wait for the dough to rise. However, if you want to be more traditional and use yeast then go ahead, I’m just here to remind you that in that case, you should let the dough rise for an hour.

What I first like to do is let the cherries soak in the bourbon, so they’re ready by the time I need to use them. Once you put that aside, you can focus on making the bread dough.

Combine the warm milk and sugar in a large mixing bowl. After the sugar dissolves, stir in the eggs, flour, salt, and the soda bicarbonate with lemon juice. Mix the ingredients until they’re completely fused and the batter is smooth. Add the butter and continue to beat it for a minute or two. Then, transfer the dough on a floured surface and knead 8-9 minutes. You can add a little bit of flour so that the batter isn’t sticky. When you’re done, leave the batter to rest in a greased bowl while you make the filling.

To make the filling you’ll need a microwave-safe bowl. If you don’t have a microwave, don’t worry, because you can also use the stove. If the filling needs 2-3 minutes in the microwave, you’ll need around 10 minutes on the stove. Simply multiply the microwave time by 4x for stove-top cooking and you’re all set.

So, combine all of the ingredients for the filling, except for the cherries and bourbon, in a microwave-safe bowl. Cover the bowl with a microwave-safe lid and microwave for 2-3 minutes on medium heat (50% power). Check whether the apples are soft and the sugar is completely dissolved. If not, microwave for another minute. Mix the ingredients, then scoop up the apple pieces and set them aside in another bowl or plate. Drain the cherries and add them to the bowl with the apple pieces. Pour the bourbon in the microwave-safe bowl and let the mixture microwave for another two minutes. Finally, you can combine the apples, cherries with the microwaved mixture. Stir well, then set aside.

It’s time to go back to our bread dough. First, take a loaf pan and line in with parchment paper. After this, spray or brush the paper with cooking oil to prepare the loaf for the bread slices. Now is also a good time to preheat the oven to 180°C (350°F), so it’s ready when you’re done building the bread. How to do this?

Well, take the bread dough and roll it out on a board. The dough sheet shouldn’t be very thick as it will rise while it bakes. Roll it until it gets to around 5 mm to 1 cm (or about 1/4 to 1/2 inch thick) and then cut it in about 20 equal squares. The best way to do this is to make one large rectangle of the dough, cut it in six strips, and then cut the strips into 4 equal squares. This will be enough to fill a 9×5 inch loaf. You can adjust if your loaf is smaller or bigger.

Take a spoon of the filling and spread over each of the dough slices. Then, take slice by slice and place them one against each other in the loaf. Another way to approach this is to add a slice to the loaf, spread filling on the side, and then immediately stick another dough slice until you build the bread. Whichever method works for you better, that’s the right one. Part of the filling will fall either way, so I simply scoop it up and pour it over the bread.

Once the bread is built you can place it in the preheated oven to bake for one hour. However, it’s a good practice to take it out halfway through and cover it with aluminum foil, then let it bake for another 30 minutes. This is because the aluminum foil prevents it from drying out and makes the bread so much moister. Although, if you like it a little more crispy and dry, you can skip this!

Another step you can skip, which I argue against, is the glaze which enhances the sweetness and beautifully contrasts the tart flavor of the apples and cherries. Plus, it’s effortless to make.

Simply, heat the cider over medium heat until it reaches a boiling point. Cook for 10 minutes and let it cool. After this, combine all the other ingredients for the glaze and whisk by hand or use an immersion blender until you get a smooth blend. Finally, add the cider and mix it again – that’s it! I recommend starting this about 15 to 20 minutes before the bread’s baking time is over.

When cooking is complete, take the bread out of the oven, pour the glaze over it, and let it cool for 10-15 minutes. After this, serve and enjoy!


Prep Cooking time Total Servings
1 hour 1 hour 2 hours 14 slices

Ingredients

For the bread dough:

  • 2 ½ cups all-purpose flour
  • ½ cup warm milk
  • ¼ cup of sugar
  • 1 egg
  • 1 egg yolk
  • 8 tbsp unsalted butter
  • ½  tsp bicarbonate of soda mixed with ½ tsp lemon juice
  • A pinch of salt

For the filling:

  • 3 medium tart apples (peeled and chopped)
  • 2 tbsp unsalted butter
  • ⅓ cup dried cherries
  • ¼ cup bourbon
  • ½ cup of sugar
  • ½ tsp cinnamon
  • A pinch of salt

(Optional) For the glaze:

  • 1 cup apple cider
  • 4 tbsp heavy cream
  • ½ teaspoon vanilla extract
  • ¼ tsp nutmeg
  • 1 cup powdered sugar

Instructions

  • In a small bowl, soak the cherries in bourbon and set them aside.
  • Take a large mixing bowl and combine the warm milk and sugar. Stir in the flour, salt, eggs, and the bicarbonate of soda with lemon juice. Stir for a minute or two, then add the butter. Beat until smooth. Transfer the dough onto a floured surface and knead for about 8-9 minutes. When finished, grease a bowl with butter, place the dough into the bowl. Set it aside.
  • Take a microwave-safe bowl and combine the rest of the ingredients for the filling – 3 peeled and chopped apples, unsalted butter, sugar, cinnamon, and a pinch of salt. Cover the bowl with a microwave-safe lid and place it in the microwave for 2-3 minutes on medium heat (50% power). Check if the apples are soft. Take a slotted spoon and scoop out the apples into a different bowl. Drain the cherries and add the bourbon into the remaining blend. Bring the bowl back to the microwave and cook for another 2 minutes.
  • Take a large bowl and combine the apples, cherries, and the microwaved blend together.
  • Line your non-stick loaf pan with parchment paper and then spray it with cooking oil.
  • Preheat the oven to 180 °C to 350 °F.
  • Roll the bread dough on a board and cut it into 20 squares.
  • Spoon the filling in the center of each square and spread out.
  • Place each slice of bread into the loaf pan, one against each other to build the pull-apart bread. If the filling falls, scoop it with a spoon and pour it over the bread.
  • Bake the bread for 1 hour. Take it out after 30 minutes, cover it with aluminum foil, then let it bake for another 30 minutes.
  • In the meantime, take a small saucepan and boil the cider. Cook for 10-12 minutes. Let it cool. Take a bowl and whisk or use an immersion blender to mix the rest of the ingredients for the topping. Add the cider and stir until smooth.
  • When baking is complete, take out the bread and pour the topping over. Let it cool for 10-15 minutes.

Faux Cronuts

Appliances Reviewed is reader-supported. When you buy through links on our site, we may earn an affiliate commission.
As an Amazon Associate I earn from qualifying purchases.

“the faux cronut that makes all the other cronuts jealous”

Do you know that THE Dominique Ansel, the creator of the original cronut, revealed his recipe? Yep, he did! I mean, why wouldn’t he? When it’s ridiculously demanding, who’s actually going to use it? According to him, it takes an astonishing three days to make the perfect cronut. So, thank you Dominique, but no thank you. If I’m in New York, I will definitely visit his bakery and try this mighty cronut, but in the meantime, my simple 30-minute faux cronut recipe will do just fine!

Actually, I have tried my fair share of cronuts and not to toot my own horn but you will thank me for this one! After Dominique’s, my recipe might just be the next best thing (okay, now I’m tooting my own horn)! What’s so special? Well, they taste like cinnamon, smell like vanilla, and are covered with a sweet and gooey chocolate glaze! What more can you ask of a cronut? Well, how to make it, obviously.

To make this recipe, you’ll need a donut cutter or any other circle pastry cutter with two dimensions, one very large pot, two mixing bowls, and some paper towels for draining the cronuts.

The first step is to heat the oil in the pan over high temperature. In order to fry the cronuts completely covered in oil, you need at least 3 inches (7 cm) of oil in the pan. This also means the pan’s walls must be high to prevent splashing. You’ll notice that you can use a variety of oils. The original cronut is cooked in grapeseed oil, while I like canola. But, feel free to use any oil that you have at your disposal – unless it’s an oil with a very intense smell, it won’t alter the taste very much.

While the oil heats, unfold the pastry sheets and use the circle cutter to cut donut-shape pastries. If you have three sheets, you’ll probably get 9 cronuts (three cronuts from each sheet). However, depending on the size you might end with 12 little cronuts or 6 very big cronuts. The only thing you need to keep in mind is that the cronuts fit into the pan comfortably.

Brush melted butter over the shaped pastry (both sides) and add one-by-one into the heated oil. Fry them separately. You’ll need around 2 minutes for each cronut (1-minute each side), which means no more than 20 minutes for the whole cooking time.

When you’re done frying a cronut, place it on a paper towel so that the oil can drain. This way, by the time you’re done frying, you can immediately begin covering them with cinnamon and chocolate.

Take two mixing bowls (one with wide-opening). In the wider bowl mix together the sugar, cinnamon, and vanilla powder. In the other bowl mix together all the ingredients for the chocolate base (powdered sugar, cocoa powder, and vanilla extract).

Take a cronut, dip it in the cinnamon mixture (both sides), place it on a serving plate, and spatter from the chocolate glade over it. Repeat the same process with the rest of the cronuts. The chocolate gaze is optional. If you have a preferred topping, feel free to use it, as I’m sure that it will make the recipe personalized to your taste.

Enjoy and don’t forget to share with your family and friends!


Prep Cooking time Total Servings
10 minutes 20 minutes 30 minutes 9

Ingredients

For the cronuts:

  • 3 sheets puff pastry (frozen)
  • 1l (4 ½ cups) cooking oil (sunflower, olive, canola, grapeseed)
  • 120g (1 cup) sugar
  • 2 tsp cinnamon
  • 1 tsp vanilla powder

For the chocolate glaze:

  • 120g (1 cup) powdered sugar
  • 2 tbsp cocoa powder
  • 1 tsp vanilla extract
  • 2 ½ tbsp milk (optional: plant-based)

Instructions

  • Pour the oil in a large pot over medium to high (~200°C) temperature and let it heat.
  • While the oil is heating, prepare the faux cronuts. Unfold the puff pastry sheets and brush them with melted butter. Use a donut cutter or any two different circle cutter sizes to create a donut shape (Usually, you’ll get 3 donuts from each pastry sheet).
  •  Fry each cronut separately (2 minutes per cronut, 1 minute each side).
  • Drain the faux cronuts on a paper towel.
  • While the cronuts drain, prepare the chocolate glaze and the sugar-cinnamon mixture.
  • Take a small bowl and mix all the ingredients for the chocolate glaze together and whisk until the blend is smooth. In another larger plate mix together the sugar, vanilla, and cinnamon.
  • Take each cronut, dip in both sides in the sugar-cinnamon mixture and place it on a serving plate. Take a spoon and spatter the chocolate glaze over the cronuts.

Homemade Cocoa Puffs

Appliances Reviewed is reader-supported. When you buy through links on our site, we may earn an affiliate commission.
As an Amazon Associate I earn from qualifying purchases.

“a delicious childhood memory”

Chocolate for breakfast – yes, please!

We’ve had our fair share of chocolate goodies for breakfast, from pancakes in many different ways to cronuts and lovely chocolaty muffins. Today, we’re making a healthy twist of one of our most memorable childhood breakfasts – cocoa puffs!

We’ll be doing a homemade version that still offers the same amazing taste only without the additives and artificial sweeteners. You can actually make these homemade cocoa puffs for your kids and let them enjoy their beloved breakfast without you having to worry about their health! Will that make you a real supermom? I say, yes!

The cocoa powder combined with the agave syrup (you can use honey as an alternative) gives an intense chocolate taste, while the vanilla enhances the flavor notes of chocolate by making it more sugary and sweet. I personally found that these homemade cocoa puffs taste so much better than the originals, but they’re not crunchy, and instead remind me of brownies – for which I can’t complain. The homemade cocoa puffs are a wonderful way to start your day!

For this recipe, you’ll need a large mixing bowl, parchment paper, baking sheet, and an airtight container to store the cocoa puffs. The whole recipe is really easy-to-follow, and you’ll be done in half an hour, so let’s begin!

The first thing you want to do is preheat the oven to (180°C) 350°F. This way, you won’t have to wait for it to heat later, or cook the cocoa puff longer.

After this, combine all of the dry ingredients in a large mixing bowl. Mix together the flour, cocoa powder, and salt. If you’re using vanilla powder, add it now and mix it together with the dry ingredients. However, if you’re using vanilla extract, stir it in after the dry ingredients are well combined.

Once the dry ingredients are mixed, stir in the egg, milk, agave syrup, and melted butter, one-by-one, to have better control over the batter. Whisk for a minute or two until you have a solid dough-like batter. The batter will be a little drier than a typical pastry dough, but that’s good.

Let the dough rest while you prepare the baking sheet. Cover it with parchment paper and spray it with cooking oil or melted butter. After this, you can start making the cocoa puffs and sorting them into the baking sheet. To do this, simply pinch a little bit of the dough and roll it in your hands until you make a marble-size ball. Repeat the same procedure until you run out of dough.

Finally, sprinkle a little bit of cocoa powder over the cocoa puffs. Place the baking sheet in the oven and bake for 15 minutes.

When they’re done baking, let the cocoa puffs chill at room temperature for 15 minutes before you store them in an airtight container. The cocoa puffs can be stored for around a week, so you can eat them anytime you want during that period. Of course, you can also make them for a family breakfast and eat them immediately afterward! Enjoy!


Prep Cooking time Total Servings
20 minutes 15 minutes 35 minutes 5

Ingredients

  • 2 cups all-purpose flour
  • ½ cup of cocoa powder
  • 1 egg white
  • ¼ cup milk (alternative: almond milk)
  • ¼ cup agave syrup
  • ¼ cup butter (melted)
  • 1 tsp vanilla powder or extract
  • ½ tsp salt

Instructions

  • Preheat the oven to (180°C) 350°F.
  • Take a large mixing bowl and combine all of the dry ingredients – the flour, cocoa powder, salt, and vanilla powder (if using extract, stir it in with the other wet ingredients).
  • Stir in the egg white, milk, agave syrup, and melted butter.
  • Whisk all the ingredients until you have a solid dough-like batter (it might be a little drier).
  • Pinch off a little bit from the batter and roll it into a marble-sized ball. Repeat the same procedure until you’ve used up all your batter.
  • Take a baking sheet and line it with parchment paper, then spray it with cooking oil.
  • Place the balls on the baking sheet and sprinkle some cocoa powder over them.
  • Bake for 15 minutes.
  • When the baking process is complete, take out the baking sheet and let the cocoa puffs cool at room temperature for at least 15-20 minutes.
  • After this, serve immediately or store them in an airtight container.

Grilled Fresh Mozzarella With Roasted Tomatoes And Basil

Appliances Reviewed is reader-supported. When you buy through links on our site, we may earn an affiliate commission.
As an Amazon Associate I earn from qualifying purchases.

“the breakfast that tastes like summer”

Other than the ultimate breakfast duo, bacon and eggs, this is another famous classic – grilled fresh mozzarella with roasted tomatoes and basil sandwich. There’s no way you haven’t tried, at least some combination of grilled cheese, tomatoes, and basil. In most recipes, the tomatoes and basil are fresh, while the cheese is grilled or fried, however, to get that ultimate smokey flavor and make the sandwich look even more appetizing, we’ll be slightly roasting the tomatoes. You didn’t think a mozzarella cheese sandwich with tomatoes and basil can get any tastier? Wait until you’ve tried this recipe.

In every grilled recipe, choosing the type of cheese you’re going to use it the first important step. You need a cheese that produces a sharp, intense flavor, that also melts easily, hence mozzarella cheese comes up as a winner. To enhance and add flavor, use dried oregano and garlic powder. If you like your sandwich hot and spicy, sprinkle a few chili flakes over the cheese and enjoy it! At the end of the day, seasoning is totally up to your preference, so use my seasoning combination merely as a recommendation.

Let’s get cooking.

All you’ll need for this recipe is a grill pan or an actual grill (even better).

The first step is to heat the grill to medium or place a grill pan over medium heat.

While the grill heats, prepare the ingredients. Cut the french bread into slices – thick or thin, depending on how you like them. Also, slice the tomatoes and mozzarella cheese (if bought as a whole piece).

Once the grill is heated, spray it with cooking oil and sprinkle each bread slice with olive oil, salt, and pepper on each side. Place the bread slices on the grill and cook for two minutes (each side). Once you notice that the bread slices are browned and grill marks appear, remove from heat and set them aside.

Next are the tomato slices. Sprinkle a little bit of olive oil, salt, and pepper on each slice and grill for four minutes (2 minutes each side). Remove tomatoes from the grill and set them aside.

Finally, spray each mozzarella slice with olive oil, salt, pepper, and chili (if you like them spicy). Grill the mozzarella slices only for a few seconds, until they start to soften, then remove from heat and place two slices of mozzarella and tomatoes on one slice of bread.

Lower the heat then return the bread slices with mozzarella ad tomatoes on the grill. Cook until the mozzarella melts over the bread. How much time you’re going to grill, depends on how soft and gooey you like the cheese. For people that like their cheese feeling a little bit solid, grill for a minute, while for people that really like their cheese melty and sticky, grill for at least two to three minutes.

After this, serve each slice of bread with two basil leaves on top. Also, spatter a few drops of olive oil and sprinkle dried oregano and garlic powder. I know I don’t have to say this, but don’t leave the cheese to get cold – eat it while it’s still hot. Enjoy!


Prep Cooking time Total Servings
10 minutes 10 minutes 20 minutes 6

Ingredients

  • 1 crusty French bread
  • 2 cups sliced tomatoes
  • 12 slices of fresh mozzarella cheese (~10 oz)
  • 12 small basil leaves
  • 1 tbsp oregano
  • 1 tbsp garlic powder
  • 1 tsp pepper
  • 1 tsp chili (optional)
  • 1 tsp salt
  • 1 tbsp olive oil

Instructions

  • Heat the grill to medium or place a grill pan over medium heat.
  • Spray it with cooking oil.
  • Slice the French bread and spatter olive oil, salt, pepper, and garlic powder on each slice. Cook for a minute or two on each side, until it gets a little browned and grill marks appear.
  • Set the bread aside and place the tomato slices on the grill. Sprinkle salt and pepper. Grill for two minutes on each side then set aside.
  • Finally, add the mozzarella slices on the grill. Spray them with olive oil, salt, and pepper (chili optional) on each side. Cook for a few seconds, just until the mozzarella softens.
  • Lower the heat, then return the bread slices on the grill. Place two slices of mozzarella cheese on each slice of bread and cover with two tomato slices. Once the mozzarella melts over the bread, remove from heat.
  • Garnish each bread slice with two basil leaves and sprinkle dried oregano.

Join Our Newsletter

Never miss a thing! Our newsletter is the perfect way to stay informed about the latest recipes and reviews that we publish.